Wiki » History » Version 46
« Previous -
Version 46/63
(diff) -
Next » -
Current version
Matthias Mauch, 2014-06-16 09:04 PM
Tony Introduction
Tony is a program for computer-aided melody annotation. It has a graphical interface based on the SV libraries and uses the pYIN Vamp plugin to extract pitch track and notes from monophonic audio.
Installation
We provide ready-to-use software builds for Windows and Mac OSX on the Downloads page. On Windows you can simply download and execute the installer (.msi), and on OSX you download the disk image (.dmg), mount it and drag "Tony" into your Applications folder.
For Linux users with ample compilation experience we also provide the source code, available on the Downloads page.
User Interface
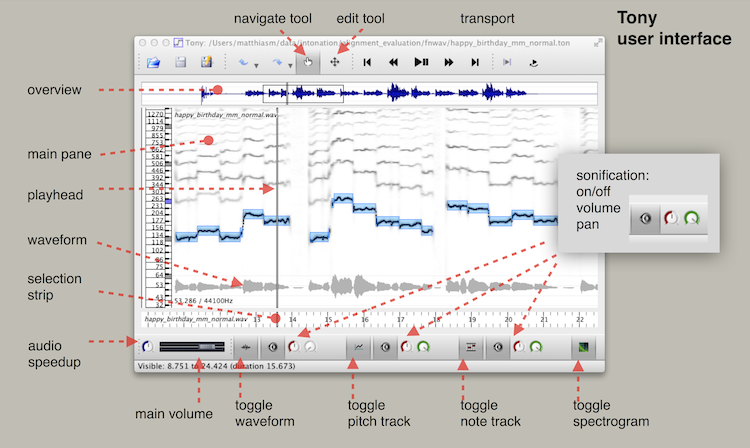
An annotated screenshot of the Tony user interface.

Quick Starter Guide
Some guided tours to help you find your way around Tony.
Guided Tour 1: First Steps
This mini-tutorial walks you through the complete process of using Tony to load an audio file, annotate the notes in it and export the notes to a .csv (comma-separated values) file.
- Start the Tony program by double-clicking (or whatever you routinely do to open programs).
- Open an audio file of your choice. Mind that Tony only deals with single melodies without accompaniment, so choose a little bit of accompanied solo singing or the like.
- Upon opening of the file, Tony will automatically analyse the file using pYin pitch and note extraction, and pitches and notes should appear. If no pitch track and notes occur, please see Analysis Settings and Visualisation, below.
- Get comfortable moving around and playback... a few suggestions:
- play audio by clicking on the play button in the top toolbar, or simply by pressing the space bar on your keyboard
- use the Navigate tool to move around in the audio file: simply left-click and drag in the main pane
- try navigating with the keyboard, too. The left and right cursor keys will move the play head
- Get comfortable with different visualisations and sonifications:
- try switching (toggling) different visualisations on and off in the bottom toolbar: waveform, pitch track (the black line), note track (the blue boxes), spectrogram (the gray-scale background)
- try switching on the pitch track sonification (sound representation) by toggling the loudspeaker symbol next to the pitch track symbol in the bottom toolbar -- you should be able to hear a funny sine-like tone at the same pitch as the original audio when sonification is on.
- turn off pitch track sonification, and turn on note track sonification -- what's the difference?
- you can switch the original audio on and off too (next to the waveform)
- what effect does the pan wheel (the one with the green circle) have on sonification? -- you can choose where in the stereo image to sonify the sounds: left, right, or anywhere in between.
Guided Tour 2: Splitting, Merging and Deleting Notes
When you load an audio file, Tony will provide you with a first note track. It's rare that the note track is perfect; here I talk you through but you can easily correct it and save it.
- Make sure you can see the note track in blue. If not, turn note visualisation on.
- Splitting a note using the Edit Tool. Choose a note and split it:
- select the Edit Tool from the top toolbar (alternatively you can type "2" on your keyboard)
- move the mouse over a note; in the middle bottom of the note the mouse pointer will turn into an upward arrow -- if it does that, left-click, and you'll have split a note!
- note that the two resulting notes will have different frequencies (Tony automatically calculates the pitch from the underlying pitch track)
- Splitting a note at the play head without using the Edit Tool. Choose another note and split that too, but now in a different way:
- put the play head where you want it by using the left/right arrows or a single left-click in the selection pane (just under the main pane)
- then go to the Edit menu and click "Split Note". There's a keyboard shortcut for this as well: simply type "/" (a slash)
- Merging two or more notes into one. Choose two notes, and merge them into one:
- Select the region with the notes you want to delete by clicking and dragging in the selection pane (just under the main pane)
- On your keyboard, press the backslash key, or, in the Edit menu, choose Merge Notes
- Deleting a note. To delete a note using the Edit Tool, move the mouse to the bottom of the note (as if you wanted to split it), press the Shift key and click. That is: deleting is like splitting with the Shift key pressed.
- Deleting multiple notes. To delete multiple notes, do the following:
- Select the region with the notes you want to delete by clicking and dragging in the selection pane (just under the main pane)
- On your keyboard, press the Backspace key, or, in the Edit menu, choose Delete Notes.
Guided Tour 3: Creating, Shortening and Extending Notes
- Extending or shortening a note. Choose a note at the end of a phrase and try to make it longer or shorter.
- when in Edit Tool mode, you can grab a note end (onset or offset) and drag to shorten or to extend the note
- Create a Note. There are two ways of making a note
- in Edit Mode, double click into the main pane at a time position where there's no other note -- a note will be created
- in Edit or Navigate Mode, select a time region in the selection pane, then, on your keyboard, press "=". Alternatively, you can go to the Edit Menu and choose "Form Note From Selection"
- The same goes for the pitch track... try it!
Guided Tour 4: Exporting and Saving
There are multiple ways to save your annotations. You can try all!
- First, you can save the whole Tony "session", that is, a document which saves the extracted pitches, notes and your changes (but not the audio!), so that if you want to resume work later, you can simply open that session file in Tony. Sessions files end in ".ton". You can save by using the File menu, then choosing "Save Session As...", and you will have to choose a name for the file you want to save.
- If you want to save a ".ton" file where your audio file is, then it's even easier: simply choose Save Session To Audio Path, and Tony will save a session at the same place and name as the audio file, but with the file extension ".ton".
- Saving only the note track. Try saving the note track, by choosing the File menu, then Export Note Data... . This will save the note data as a text file with commas between the values, a so-called comma-separated values file with the extension ".csv".
- save a file test.csv and open it in a text editor or in a spread sheet. You will see that the first column provides note onsets (in seconds), the second column the note frequencies (Hz), the third column the note durations (seconds), and the fourth column... is currently just a weird value. Sorry.
- Saving only the pitch track. Works pretty much in the same way as saving the note track.
- The result is different, however: you have only three columns in your .csv file: timestamp (in seconds) and frequency (Hz)
Menus
File Menu
Edit Menu
View Menu
Analysis Menu
The "Analysis" menu allows you to re-analyse the audio for pitches and notes and to choose some analysis settings.
- Analyse Now! will run pYin to extract pitches and notes and replaces all currently annotated pitches and notes. While you can undo this, you might still want to consider carefully whether to use this option if you have put a lot of work into annotating notes or pitches.
- Auto-Analyse New Audio. Tony will, by default, analyse any new audio that you load. If you do not want this behaviour, you can de-select it here.
- Unbiased Timing (slow). By default the pYin analysis is based on ordinary YIN, which has a funky asymmetric window and introduces a small timing bias of up to 5ms. If you need zero time bias, then tick this item. This will be much slower, since this option cannot use the Fast Fourier Transform.
- Penalise Soft Pitches: this option is on by default and reduces the impact of very low-amplitude content, effectively suppressing some spurious pitches. If you don't want this, untick.
Toolbars
not covered (yet?)